Ever felt frustrated while setting up a private burp collaborator by your own? If you have came across this post (by doing google) then you surely having a very bad time setting up your own private collaborator.
In this blog post i will help you to setup your own personal burp collaborator. You can always refer official blog post for more information however in my case i found it very complicated (for a newbie)
Prerequisite
- A VPS ( I am using $10 Digital Ocean VPS)
- A Domain name ( Subdomain would also work)
- A Wildcard DNS Certificate ( Free LetsEncrypt Certificate)
- Burp Suite Pro ( You don’t need license , that means anyone including BurpCommunity users can also deploy private collaborator server)
Let’s get started
Setting up VPS
Login in your VPS and run below commands
sudo apt-get update // update package
sudo apt-get install default-jre // install Java Runtime Enviornment
sudo mkdir -p /usr/local/collaborator/  // Create a directory
Now download latest BurpSuite Pro from here and push it to /collaborator directory.
Run ifconfig command in terminal and look for your internal and external IP.

Now create a collaborator.config file under /collaborator directory and edit it with below content.
nano /usr/local/collaborator/collaborator.config
{
  "serverDomain" : "outofbandconnections.yourdomain.com",
  "workerThreads" : 10,
  "eventCapture": {
      "localAddress" : [ "139.59.x.x" ],
      "publicAddress" : "139.59.x.x",
      "http": {
         "ports" : 80
       },
      "https": {
          "ports" : 443
      },
      "smtp": {
          "ports" : [25, 587]
      },
      "smtps": {
          "ports" : 465
      },
      "ssl": {
          "certificateFiles" : [
              "/usr/local/collaborator/keys/privkey.pem",
              "/usr/local/collaborator/keys/cert.pem",
              "/usr/local/collaborator/keys/fullchain.pem" ]
      }
  },
  "polling" : {
      "localAddress" :  "139.59.x.x",
      "publicAddress" :  "139.59.x.x",
      "http": {
          "port" : 39090
      },
      "https": {
          "port" : 39443
      },
      "ssl": {
          "certificateFiles" : [
              "/usr/local/collaborator/keys/privkey.pem",
              "/usr/local/collaborator/keys/cert.pem",
              "/usr/local/collaborator/keys/fullchain.pem" ]

      }
  },
  "metrics": {
      "path" : "jnaicmez8",
      "addressWhitelist" : ["0.0.0.0/1"]
  },
  "dns": {
      "interfaces" : [{
          "name":"ns1.outofbandconnections.yourdomain.com",
          "localAddress":"139.59.x.x",
          "publicAddress":"139.59.x.x"
      }],
      "ports" : 53
   },
   "logLevel" : "INFO"
}
In localAddress and publicAddress enter your VPS IP by running ifconfig command and replace serverDomain with your domain name.
Setting up wildcard SSL certificates
Create a configure_certs.sh file under our working directory with below code.
sudo nano /usr/local/collaborator/configure_certs.shCERTBOT_DOMAIN=$1
if [ -z $1 ];
then
echo "Missing mandatory argument. "
echo " - Usage: $0 <domain> "
exit 1
fi
CERT_PATH=/etc/letsencrypt/live/$CERTBOT_DOMAIN/
mkdir -p /usr/local/collaborator/keys/
if [[ -f $CERT_PATH/privkey.pem && -f $CERT_PATH/fullchain.pem && -f $CERT_PATH/cert.pem ]]; then
cp $CERT_PATH/privkey.pem /usr/local/collaborator/keys/
cp $CERT_PATH/fullchain.pem /usr/local/collaborator/keys/
cp $CERT_PATH/cert.pem /usr/local/collaborator/keys/
chown -R collaborator /usr/local/collaborator/keys
echo "Certificates installed successfully"
else
echo "Unable to find certificates in $CERT_PATH"
fito install Let’s Encrypt certificates run below command.
snap install --classic certbot
certbot certonly -d outofbandconnections.yourdomain.com -d *.outofbandconnections.yourdomain.com --server https://acme-v02.api.letsencrypt.org/directory --manual --agree-tos --no-eff-email --manual-public-ip-logging-ok --preferred-challenges dns-01
Follow the guide (it will ask you to insert your email).
After that, you will see the first message on how to deplay a DNS TXT record. Press Enter and let it give you a second message.
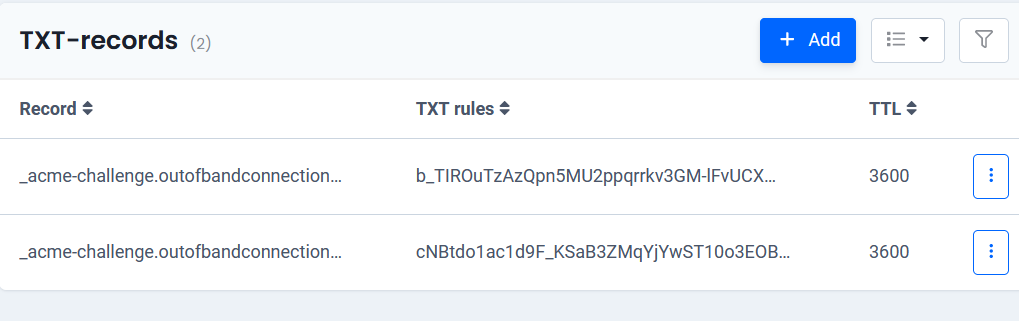
Now that you have two different TXT records to setup, go to your DNS server and configure both records (using the same name: “_acme-challenge.outofbandconnections”).
Run below command to install certificates
chmod +x /usr/local/collaborator/configure_certs.sh && /usr/local/collaborator/configure_certs.sh outofbandconnections.yourdomain.comNow lets run our collaborator server over VPS for first time. Run below command and see if our ports are mapped correctly.
NOTE: Other services might be using these ports which we have defined in our collaborator.config file. So make sure no other services are using these ports, if so then close those service first then run below command.
bash -c "java -Xms10m -Xmx200m -XX:GCTimeRatio=19 -jar /usr/local/collaborator/burpsuite_pro_version --collaborator-server --collaborator-config=/usr/local/collaborator/collaborator.config"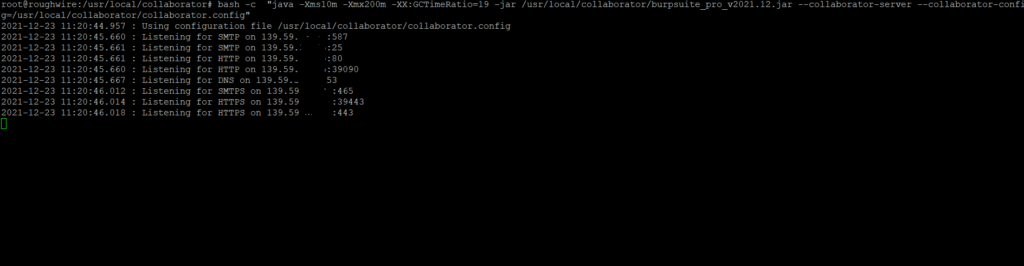
If everything works fine then we are ready to move on to next phase which is setting DNS. Press CTRL + C for a while and stop the services.
DNS
Go to your DNS server and create two new records.
- Create a
NSrecords which pointsoutofbandconnections.yourdomain.comtons1.outofbandconnections.yourdomain.com - Create
Arecord which pointsns1.outofbandconnections.yourdomain.comtoX.X.X.X(Your VPS External IP)


That’s it! We are done here. To run collaborator service continuously we can create a service. Follow below steps to create a collaborator service.
sudo nano /etc/systemd/system/collaborator.service // create a file
Copy the below code in collaborator.service file
[Unit]
Description=Burp Collaborator Server Daemon
After=network.target

[Service]
Type=simple
UMask=007
ExecStart=/usr/bin/java -Xms10m -Xmx200m -XX:GCTimeRatio=19 -jar /usr/local/collaborator/burpsuite_pro_version --collaborator-server --collaborator-config=/usr/local/collaborator/collaborator.config
Restart=on-failure

# Configures the time to wait before service is stopped forcefully.
TimeoutStopSec=300

[Install]
WantedBy=multi-user.target
Enable the service:
systemctl enable collaborator
Finally, start the service:
systemctl start collaborator
BurpSuite Setup
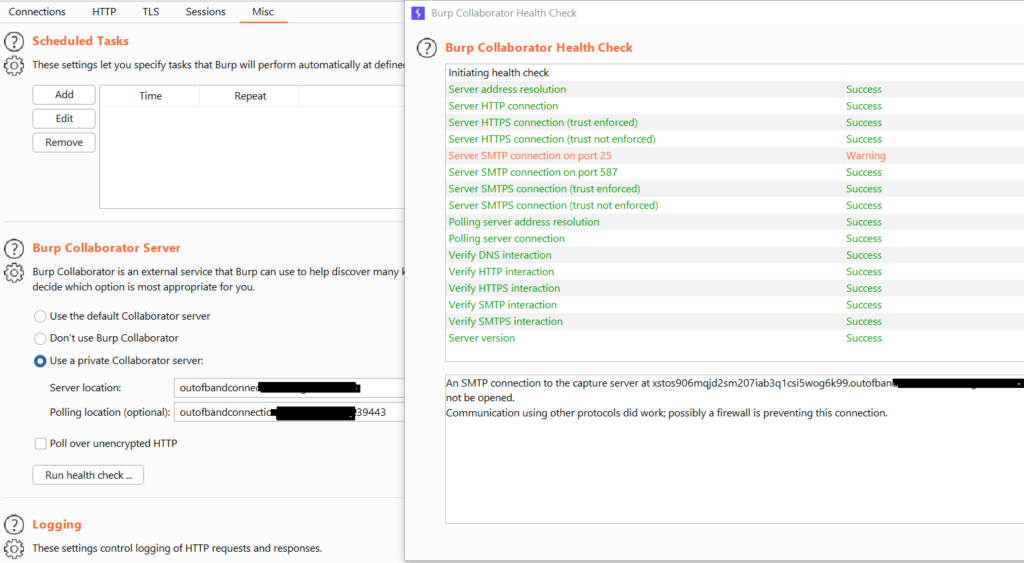
Open your Burp Suite, go to “Project Options” > “Misc” tab, and configure the following settings:
- Server location: outofbandconnections.yourdomain.com
- Polling location : outofbandconnections.yourdomain.com:39443
Final Note:
If you get any error then feel free to ping me over twitter @roughwire Until Next time!
Reference
https://portswigger.net/burp/documentation/collaborator/deploying
https://blog.fabiopires.pt/running-your-instance-of-burp-collaborator-server/
After many, many tutorials & readings, I finally found one that helped. Thanks a ton